Why You’ll Love This Recipe
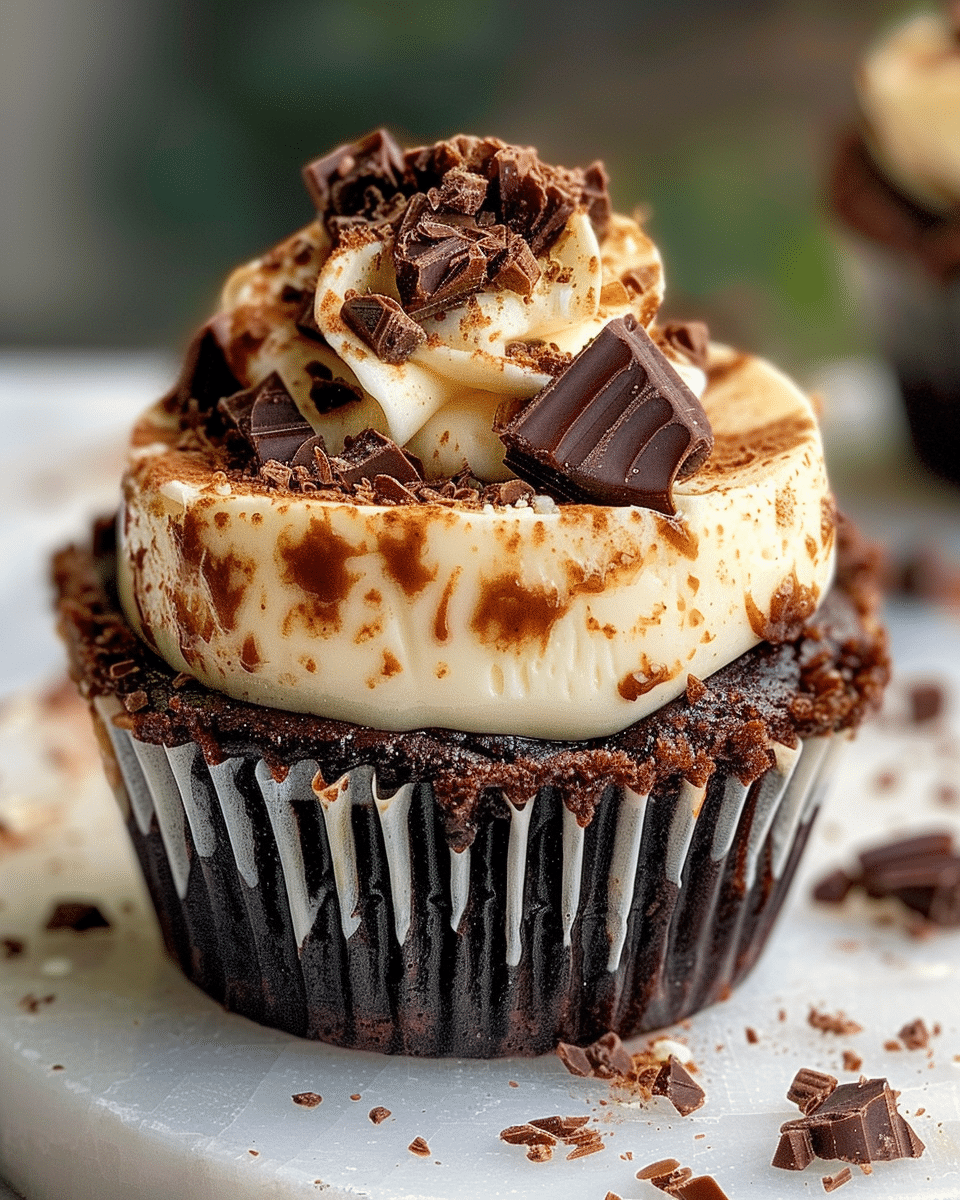
If you’re a fan of both brownies and cheesecake, then Loaded Brownie Cheesecake Cups are a dream come true. Each individual cup packs the rich, dense flavor of a brownie with the tangy, smooth texture of cheesecake. And with endless topping possibilities like chocolate chips, crushed Oreos, and caramel drizzle, there’s no wrong way to make them. They’re perfect for sharing at gatherings or savoring on your own when the craving hits. Plus, they’re easy to make and serve, ensuring you can enjoy this decadent treat without the hassle.
Ingredients
For the Brownie Layer:
-
½ cup unsalted butter, melted
-
¾ cup granulated sugar
-
2 large eggs
-
1 teaspoon vanilla extract
-
⅓ cup unsweetened cocoa powder
-
½ cup all-purpose flour
-
¼ teaspoon salt
-
½ cup semi-sweet chocolate chips
For the Cheesecake Layer:
-
8 oz cream cheese, softened
-
¼ cup granulated sugar
-
1 large egg
-
½ teaspoon vanilla extract
Toppings (Optional but Recommended):
-
Mini chocolate chips
-
Crushed Oreos or chocolate cookies
-
Chopped peanuts or walnuts
-
Caramel or chocolate drizzle
-
Whipped cream (for serving)
(Tip: You’ll find the full list of ingredients and measurements in the recipe card below.)

Directions
-
Preheat and Prep
Preheat oven to 350°F (175°C). Line a standard muffin tin with 12 paper cupcake liners. -
Make the Brownie Layer
In a mixing bowl, whisk together melted butter, sugar, eggs, and vanilla. Stir in cocoa powder, flour, and salt until smooth. Fold in chocolate chips. Spoon about 1 heaping tablespoon of brownie batter into the bottom of each cupcake liner, pressing it slightly to form an even layer. -
Prepare the Cheesecake Layer
In a separate bowl, beat cream cheese until smooth. Add sugar, egg, and vanilla; beat until creamy and lump-free. Spoon about 1 tablespoon of cheesecake batter over the brownie base in each cup, smoothing the top. -
Load It Up
Sprinkle with your favorite toppings—mini chocolate chips, cookie crumbs, crushed nuts, or a drizzle of caramel. -
Bake
Bake for 25–30 minutes, or until the cheesecake layer is set and just slightly jiggly in the center. Remove from oven and allow to cool in the pan for 10–15 minutes, then transfer to a wire rack to cool completely. -
Chill (Optional but Recommended)
For best texture and flavor, chill the cups in the refrigerator for at least 1 hour before serving. They taste even better cold!
Servings and Timing
-
Servings: 12 cheesecake cups
-
Prep Time: 20 minutes
-
Bake Time: 25–30 minutes
-
Cooling Time: 1 hour (plus chilling if desired)
-
Total Time: About 1 hour 45 minutes
Variations
-
Flavored Cheesecake Layer: Add citrus zest, or swirl in fruit puree like raspberry or strawberry for a fruity twist.
-
Nutty Brownie Layer: Add chopped almonds, walnuts, or hazelnuts to the brownie base for an extra crunch.
-
Vegan Version: Swap out the dairy and eggs for plant-based alternatives like vegan cream cheese, almond milk, and flax eggs.
Storage/Reheating
-
Storage: Store any leftover Loaded Brownie Cheesecake Cups in an airtight container in the refrigerator for up to 3–4 days.
-
Reheating: These cheesecake cups are best served cold, but if you prefer them slightly warm, reheat them in the microwave for 10–15 seconds. However, they are equally delicious straight from the fridge!
FAQs
How do I know when my Loaded Brownie Cheesecake Cups are done?
The cheesecake layer should be set but still slightly jiggly in the center. You can test with a toothpick; it should come out clean from the brownie portion but slightly moist from the cheesecake layer.
Can I use a different type of chocolate for the brownie layer?
Yes, you can use milk chocolate or dark chocolate chips in place of semi-sweet chocolate for a different flavor profile.
Can I make these in advance?
Absolutely! These cheesecake cups can be made a day ahead. Simply refrigerate them for the best texture and flavor.
Can I freeze Loaded Brownie Cheesecake Cups?
Yes, you can freeze the cheesecake cups. Wrap each one in plastic wrap, then place them in an airtight container or freezer bag. Thaw them in the refrigerator before serving.
How do I prevent the cheesecake layer from cracking?
Make sure not to overbake the cheesecake cups. Also, allow them to cool gradually and chill them in the fridge to avoid cracks.
What is the best way to serve these?
Serve them chilled with a dollop of whipped cream and a drizzle of caramel or chocolate for an extra indulgent treat.
Can I make these without the topping?
Of course! While the toppings add texture and flavor, the brownie cheesecake cups are delicious on their own.
How do I get the perfect brownie base?
Make sure to press the brownie batter down firmly in each cupcake liner to create a solid base for the cheesecake layer.
Can I double the recipe?
Yes, you can double the ingredients to make more cups. Just be sure to adjust the bake time slightly if needed.
What can I use if I don’t have paper cupcake liners?
You can use silicone muffin cups or lightly grease your muffin tin to avoid sticking.
Conclusion
Loaded Brownie Cheesecake Cups are the ultimate indulgence, combining the rich decadence of brownies with the creamy tang of cheesecake in a convenient, individual-sized serving. Whether you’re serving them at a party or enjoying them as a personal treat, these cups are sure to impress. The versatility of the toppings lets you make them your own, and with a little prep and patience, you can enjoy these mouthwatering desserts any time.
Loaded Brownie Cheesecake Cups: Decadent, Indulgent, and Unforgettable
5 Stars 4 Stars 3 Stars 2 Stars 1 Star
No reviews
- Author: Paula
- Total Time: 1 hour 45 minutes
- Yield: 12 servings
- Diet: Vegetarian
Description
Loaded Brownie Cheesecake Cups combine the best of two beloved desserts: brownies and cheesecake. These indulgent treats offer a rich, fudgy brownie base topped with a smooth, creamy cheesecake layer, and then the fun begins with delicious toppings like chocolate chips, cookie crumbles, and caramel drizzle. Perfect for any special occasion, party, or even when you just want to indulge yourself, these cups promise to spoil your taste buds and leave you wanting more.
Ingredients
½ cup unsalted butter, melted
¾ cup granulated sugar
2 large eggs
1 teaspoon vanilla extract
⅓ cup unsweetened cocoa powder
½ cup all-purpose flour
¼ teaspoon salt
½ cup semi-sweet chocolate chips
8 oz cream cheese, softened
¼ cup granulated sugar
1 large egg
½ teaspoon vanilla extract
Mini chocolate chips (for topping, optional)
Crushed Oreos or chocolate cookies (for topping, optional)
Chopped peanuts or walnuts (for topping, optional)
Caramel or chocolate drizzle (for topping, optional)
Whipped cream (for serving, optional)
Instructions
- Preheat oven to 350°F (175°C). Line a standard muffin tin with 12 paper cupcake liners.
- In a mixing bowl, whisk together melted butter, sugar, eggs, and vanilla. Stir in cocoa powder, flour, and salt until smooth. Fold in chocolate chips. Spoon about 1 heaping tablespoon of brownie batter into the bottom of each cupcake liner, pressing it slightly to form an even layer.
- In a separate bowl, beat cream cheese until smooth. Add sugar, egg, and vanilla; beat until creamy and lump-free. Spoon about 1 tablespoon of cheesecake batter over the brownie base in each cup, smoothing the top.
- Sprinkle with your favorite toppings—mini chocolate chips, cookie crumbs, crushed nuts, or a drizzle of caramel.
- Bake for 25–30 minutes, or until the cheesecake layer is set and just slightly jiggly in the center. Remove from oven and allow to cool in the pan for 10–15 minutes, then transfer to a wire rack to cool completely.
- For best texture and flavor, chill the cups in the refrigerator for at least 1 hour before serving. They taste even better cold!
Notes
Flavored Cheesecake Layer: Add citrus zest, or swirl in fruit puree like raspberry or strawberry for a fruity twist.
Nutty Brownie Layer: Add chopped almonds, walnuts, or hazelnuts to the brownie base for an extra crunch.
Vegan Version: Swap out the dairy and eggs for plant-based alternatives like vegan cream cheese, almond milk, and flax eggs.
Storage: Store any leftover Loaded Brownie Cheesecake Cups in an airtight container in the refrigerator for up to 3–4 days.
Reheating: These cheesecake cups are best served cold, but if you prefer them slightly warm, reheat them in the microwave for 10–15 seconds.
Freezing: Wrap each cup in plastic wrap, then place them in an airtight container or freezer bag. Thaw in the refrigerator before serving.
- Prep Time: 20 minutes
- Cook Time: undefined
- Category: Dessert
- Method: Baking
- Cuisine: American
Nutrition
- Serving Size: 1 cheesecake cup
- Calories: 250
- Sugar: 20g
- Sodium: 160mg
- Fat: 15g
- Saturated Fat: 7g
- Unsaturated Fat: 8g
- Trans Fat: 0g
- Carbohydrates: 30g
- Fiber: 2g
- Protein: 3g
- Cholesterol: 50mg

