I really enjoy how this recipe blends two different cake batters into a beautiful swirl that looks impressive without any extra effort. I love the softness from the buttermilk, the hint of cocoa, and the cool peppermint aroma that fills the frosting. I also appreciate how straightforward the steps are, making it easy for me to create a show-stopping dessert perfect for Christmas parties, gifting, or cozy family celebrations.
Ingredients
(Note: All ingredient amounts are listed in the recipe card below.)
I begin by preheating my oven to 350°F (175°C) and greasing and flouring three 9-inch round cake pans.
In a large bowl, I combine the white cake mix, egg whites, 1⅓ cups buttermilk, and vegetable oil. I mix this with an electric mixer on high speed for 2 minutes. In a separate bowl, I mix together the yellow cake mix, ½ cup buttermilk, 1 egg, cocoa powder, red food coloring, and cider vinegar. I beat this mixture for 2 minutes on high speed as well.
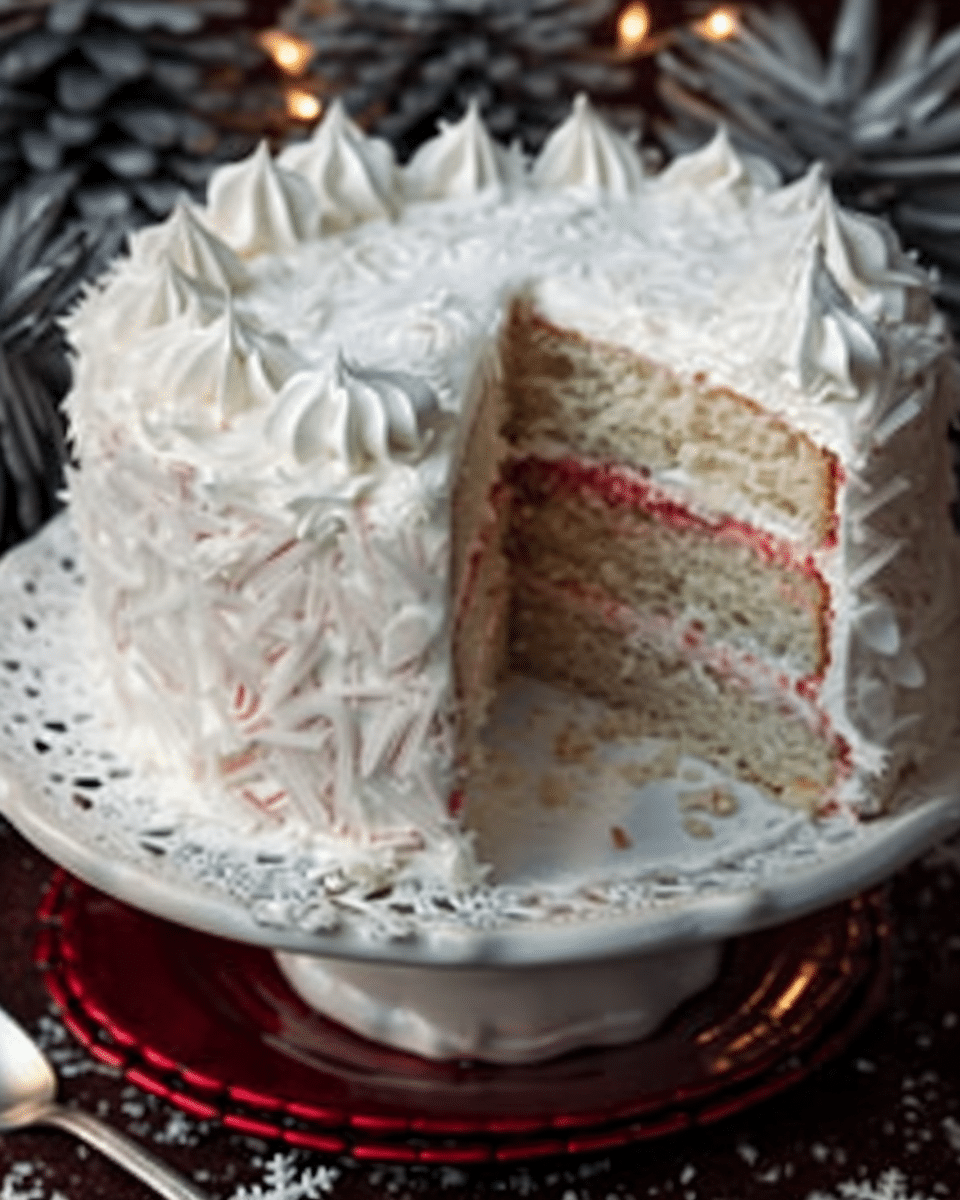
To create the marbled effect, I spoon alternating scoops of the white batter and red batter into the prepared cake pans. I gently swirl a knife through the batters to create pretty streaks without fully blending them.
I bake the cakes for 22–25 minutes, or until a wooden pick inserted into the center comes out clean. I allow the cakes to cool in their pans for at least 10 minutes before turning them out onto wire racks to cool completely.
For the frosting, I beat the softened cream cheese and margarine together in a large bowl until smooth. I gradually blend in the confectioners’ sugar until the frosting is creamy, then stir in the peppermint extract. I spread the frosting between the cooled cake layers and over the top and sides of the cake.
I like adding crushed peppermint candies on top for extra texture and sparkle. Sometimes I tint half of the frosting light pink and swirl it for a festive look. I also enjoy adding a tiny pinch of espresso powder to the red batter to deepen the cocoa flavor. When I want height, I bake the batter as two thicker layers instead of three and frost generously.
Storage/Reheating
I store this cake covered in the refrigerator for up to 3 days. The peppermint flavor actually deepens as it chills, which I really enjoy. To serve, I let slices sit at room temperature for about 20 minutes so the texture becomes soft and tender again. Because of the cream cheese frosting, I don’t leave the cake out for long periods and I don’t freeze the fully assembled cake, as the frosting can lose its smooth consistency.
FAQs
Can I make this cake ahead of time?
Yes, I often bake the layers a day ahead and frost them the next day.
Can I use butter instead of margarine in the frosting?
Yes, I can use butter, but the texture and sweetness may vary slightly.
Why is my cake dry?
Overbaking can cause dryness. I check the cakes at the earliest time listed.
Can I use gel food coloring instead of liquid?
Yes, I can use gel coloring; I just adjust the amount until I get a rich red shade.
Can I make the frosting stronger or milder in peppermint flavor?
Yes, I adjust the peppermint extract to taste.
Can I turn this into cupcakes?
Yes, I bake them for 15–18 minutes, checking with a toothpick for doneness.
Can I frost the cake while it’s warm?
No, I wait until the cakes are fully cooled so the frosting doesn’t melt.
Can I use homemade cake batter instead of boxed?
Yes, I can replace both boxed mixes with equivalent homemade vanilla batter divided into two portions.
Why didn’t my swirl show well?
I may have overmixed the batters after adding them to the pan. I swirl gently next time.
Can I add chocolate chips?
Yes, mini chocolate chips work well folded into the red batter.
Conclusion
I love making Santa’s Favorite Cake because it brings together festive colors, nostalgic peppermint flavor, and a creamy frosting that makes every bite taste like a holiday celebration. Whether I serve it at a party or enjoy it with a cozy cup of cocoa, this cake always feels cheerful, delicious, and wonderfully merry.


