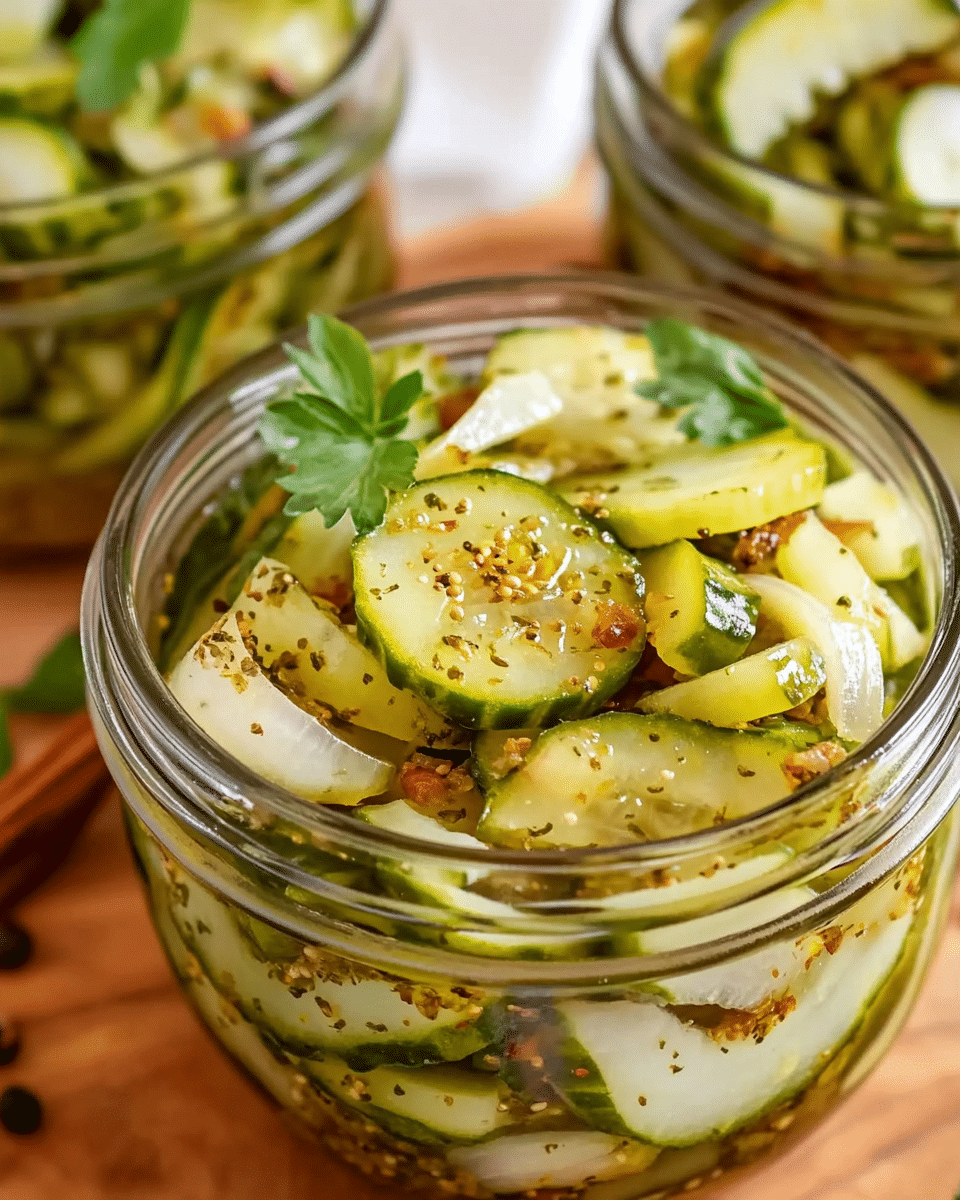
These crisp, tangy refrigerator pickles are the perfect way to preserve fresh cucumbers without the hassle of traditional canning. Ready in just 24 hours, they deliver that signature pickle crunch and flavor with minimal effort.
Why You’ll Love This Recipe
These homemade refrigerator pickles are a game-changer for pickle enthusiasts and beginners alike. Unlike traditional canning methods, there’s no special equipment needed—just simple jars and basic ingredients. You can customize the flavors to your preference, making them as mild or spicy as you like. They’re ready after just 24 hours in the refrigerator, though they get even better with time. Plus, the recipe is incredibly forgiving, making it perfect for novice cooks. Whether you’re dealing with a cucumber surplus from your garden or simply craving something homemade, these pickles deliver restaurant-quality results with minimal effort.
Ingredients
(Tip: You’ll find the full list of ingredients and measurements in the recipe card below.)
All-purpose white distilled vinegar creates the acidic environment needed for that classic pickle tang and helps preserve your cucumbers. Its clean flavor doesn’t compete with the seasonings, letting the herbs and spices shine through.
Kosher salt is preferred for pickling due to its pure flavor and absence of anti-caking agents or iodine, which can cloud your brine and affect taste. Don’t substitute table salt as the measurements and flavor profile will be different.
Sugar balances the acidity of the vinegar and enhances the overall flavor profile. Even if you prefer savory pickles, don’t skip this ingredient—it rounds out the tanginess rather than making the pickles sweet.
Fresh cucumbers are the star of the show. Small to medium cucumbers work best as they have fewer seeds and firmer flesh. Persian, Kirby, or pickling cucumbers are ideal choices, but standard garden cucumbers will work too if they’re not too large.
Fresh dill brings that signature pickle flavor that’s irreplaceable. The feathery leaves and sometimes the flowering heads impart the aromatic, herbaceous notes that define a great dill pickle.
Pickling spice blend typically includes mustard seeds, allspice, coriander, bay leaves, and other spices that give your pickles complexity. You can use a pre-made blend or create your own by combining your favorite pickling spices.
Garlic cloves infuse the brine with their distinctive flavor, becoming more pronounced as the pickles mature. For extra flavor, lightly crush the cloves before adding them to release more of their aromatic oils.
Red pepper flakes are optional but add a pleasant heat that builds in the pickles over time. You can adjust the amount based on your spice preference or omit them entirely for mild pickles.
Directions
- Wash and dry jars, lids, and rings thoroughly. Set aside.
- In a large saucepan over medium heat, combine water, vinegar, salt, and sugar. Simmer until salt and sugar dissolve, about 5 minutes. Let the brine cool.
- Slice cucumbers into ½-inch rounds or spears. Remove dill leaves from stems, keeping them in small bunches.
- To assemble jars, begin by adding 1½ teaspoons of pickling spice and a small sprig of dill to the bottom of each jar.
- Add a layer of cucumber slices, followed by a portion of dill and one garlic clove. Repeat the layering process until jars are filled, using three garlic cloves and a portion of dill per jar.
- If desired, sprinkle a pinch of red pepper flakes on top for added heat.
- Carefully pour the cooled vinegar mixture into the jars, making sure to fully cover the cucumbers.
- Seal the jars tightly with lids and rings.
- Once jars are cool, place them in the refrigerator. Allow the pickles to chill and marinate for at least 24 hours before serving.
Servings and Timing
This recipe yields approximately 4 pints of pickles, which equals about 20 servings. The preparation is quick and simple, taking only 10 minutes of hands-on time and 5 minutes of cooking time for the brine. The most important part is the chilling time—a minimum of 24 hours is required to allow the flavors to develop, but the pickles will continue to improve in flavor for up to a week. Total time from start to first pickle is 1 day and 15 minutes. At 25 calories per serving, these pickles are a guilt-free addition to sandwiches, burgers, or enjoyed on their own.
Variations
Bread and Butter Pickles: For a sweeter version, increase the sugar to ½ cup and add ½ teaspoon of celery seed and ½ teaspoon of ground turmeric to the brine.
Spicy Garlic Pickles: Double the garlic and add 1-2 sliced jalapeños or 1 teaspoon of crushed red pepper flakes per jar for heat lovers.
Herb Garden Pickles: Add fresh herbs like thyme, rosemary, or tarragon alongside or in place of the dill for a unique flavor profile.
Curry Pickles: Add 1 tablespoon of curry powder to the brine for an exotic twist that pairs beautifully with Indian dishes.
Lemon Dill Pickles: Add 2-3 thin slices of lemon to each jar along with an extra sprig of dill for a bright, citrusy variation.
Ranch Pickles: Add 2 tablespoons of dried ranch seasoning mix to the brine for a tangy, herbaceous flavor that’s especially kid-friendly.
Pickle Spears: Instead of slicing into rounds, cut the cucumbers lengthwise into quarters or sixths for perfect sandwich or snacking spears.
Storage/Reheating
These refrigerator pickles must be stored in the refrigerator at all times—they are not shelf-stable like traditionally canned pickles. When properly stored in airtight jars, they will maintain their quality for up to 2 months, though they’re often at their flavor and texture peak between 1-4 weeks after making.
Make sure the pickles stay submerged in the brine to prevent spoilage. If you notice the level of liquid decreasing, you can top it off with a mixture of equal parts water and vinegar.
Unlike many foods, these pickles should never be reheated—they’re designed to be enjoyed cold straight from the refrigerator. If they’ve been left out at room temperature for more than 2 hours, it’s safest to discard them.
For the best experience, always use clean utensils when retrieving pickles from the jar to prevent introducing bacteria that could shorten their shelf life.
FAQs
Why are refrigerator pickles better than store-bought?
Refrigerator pickles offer fresher flavor and crunchier texture than commercially processed options. They contain no preservatives or artificial ingredients and can be customized to your exact taste preferences. Additionally, they’re usually more economical, especially if you have access to garden-fresh cucumbers.
Can I use regular table salt instead of kosher salt?
While you can use table salt in a pinch, it’s not ideal. Table salt contains iodine and anti-caking agents that can make your brine cloudy and impart a slightly metallic taste. If you must substitute, use about half the amount of table salt as the kosher salt called for in the recipe.
How long do these pickles need to sit before eating?
The minimum waiting period is 24 hours, but the flavor improves significantly after 48-72 hours. For the best experience, try to wait at least 3 days before enjoying your homemade pickles.
Why did my pickles turn out soft or mushy?
Soft pickles are usually caused by using overripe cucumbers or not trimming the blossom end (which contains enzymes that can soften pickles). Make sure to use fresh, firm cucumbers and trim both ends before pickling. Adding a grape leaf or oak leaf to each jar can also help maintain crispness.
Can I reuse the brine when the pickles are gone?
Absolutely! The flavorful brine can be reused once or twice for new batches of pickles. Simply bring it to a brief boil before using it again. You can also use leftover pickle brine to marinate chicken, add flavor to potato salad, or create a unique salad dressing.
Are these pickles safe for canning?
This recipe is specifically designed for refrigeration, not shelf-stable canning. The acidity level and processing time haven’t been tested for canning safety. If you want shelf-stable pickles, look for a recipe specifically developed for water bath canning.
Can I use different vegetables for this recipe?
Yes! This brine works wonderfully with carrots, green beans, cauliflower, bell peppers, and even sliced onions. Just keep in mind that different vegetables will absorb the flavors at different rates and may require different chilling times.
Why did my garlic turn blue or green in the jar?
This is a harmless chemical reaction between sulfur compounds in the garlic and trace minerals in your water, salt, or vinegar. The pickles are completely safe to eat, and the color usually fades over time. To minimize this reaction, use filtered water and fresh garlic.
How can I make these pickles less sour?
If you prefer a milder pickle, you can adjust the vinegar-to-water ratio by reducing the vinegar to 1½ cups and increasing the water to 4½ cups. You can also increase the sugar to 4-5 tablespoons to balance the acidity without making truly sweet pickles.
Do I need to sterilize the jars for refrigerator pickles?
Since these pickles will be stored in the refrigerator rather than at room temperature, sterilizing isn’t strictly necessary. However, thoroughly washing the jars, lids, and rings in hot, soapy water and allowing them to air dry or drying with a clean towel is essential for food safety.
Conclusion
These easy refrigerator pickles are a perfect entry point into the world of homemade preserving. With minimal effort and just a day of patience, you’ll have crisp, flavorful pickles that outshine anything from the grocery store shelf. They’re versatile enough to complement anything from a gourmet charcuterie board to a simple backyard burger, and the recipe is endlessly customizable to suit your taste preferences. Once you master this basic technique, you’ll find yourself making batch after batch, experimenting with different spices, herbs, and vegetables. The satisfaction of transforming fresh cucumbers into something even more delicious is truly rewarding, and these refrigerator pickles might just become your signature homemade treat.
Print
The BEST Refrigerator Pickles
- Total Time: 1 day 15 minutes
- Yield: 20 servings
- Diet: Gluten Free
Description
Easy and quick-to-make refrigerator pickles that are crisp, flavorful, and perfect for snacking or as a side for meals.
Ingredients
- 4 wide mouth pint jars (with lids and rings)
- 4 cups water
- 2 cups white distilled vinegar
- 3 tablespoons kosher salt
- 3 tablespoons sugar
- 2 pounds small to medium cucumbers, ends trimmed and sliced (or cut into spears)
- 1 large bunch fresh dill
- 1.5 ounce jar pickling spice (divided use)
- 12 cloves peeled garlic (divided use)
- Red pepper flakes (optional)
Instructions
- Wash and dry jars, lids, and rings thoroughly. Set aside.
- In a large saucepan over medium heat, combine water, vinegar, kosher salt, and sugar. Simmer until salt and sugar dissolve, about 5 minutes. Let the brine cool completely.
- Slice cucumbers into ½-inch rounds or spears. Remove dill leaves from stems, keeping them in small bunches.
- To assemble jars, begin by adding 1½ teaspoons of pickling spice and a small sprig of dill to the bottom of each jar.
- Add a layer of cucumber slices, followed by a portion of dill and one garlic clove. Repeat the layering process until jars are filled, using three garlic cloves and a portion of dill per jar.
- If desired, sprinkle a pinch of red pepper flakes on top for added heat.
- Carefully pour the cooled vinegar mixture into the jars, making sure to fully cover the cucumbers.
- Seal the jars tightly with lids and rings.
- Once jars are cool, place them in the refrigerator. Allow the pickles to chill and marinate for at least 24 hours before serving.
Notes
- Pickles taste better after marinating for 24-48 hours.
- Adjust the amount of red pepper flakes for your desired heat level.
- Ensure jars are dry and clean to prevent contamination.
- Prep Time: 10 minutes
- Cook Time: 5 minutes
- Category: Snack, Side Dish
- Method: Refrigerated Pickling
- Cuisine: American
Nutrition
- Serving Size: 1 serving
- Calories: 25
- Sugar: 1g
- Sodium: 290mg
- Fat: 0g
- Saturated Fat: 0g
- Unsaturated Fat: 0g
- Trans Fat: 0g
- Carbohydrates: 5g
- Fiber: 1g
- Protein: 1g
- Cholesterol: 0mg


