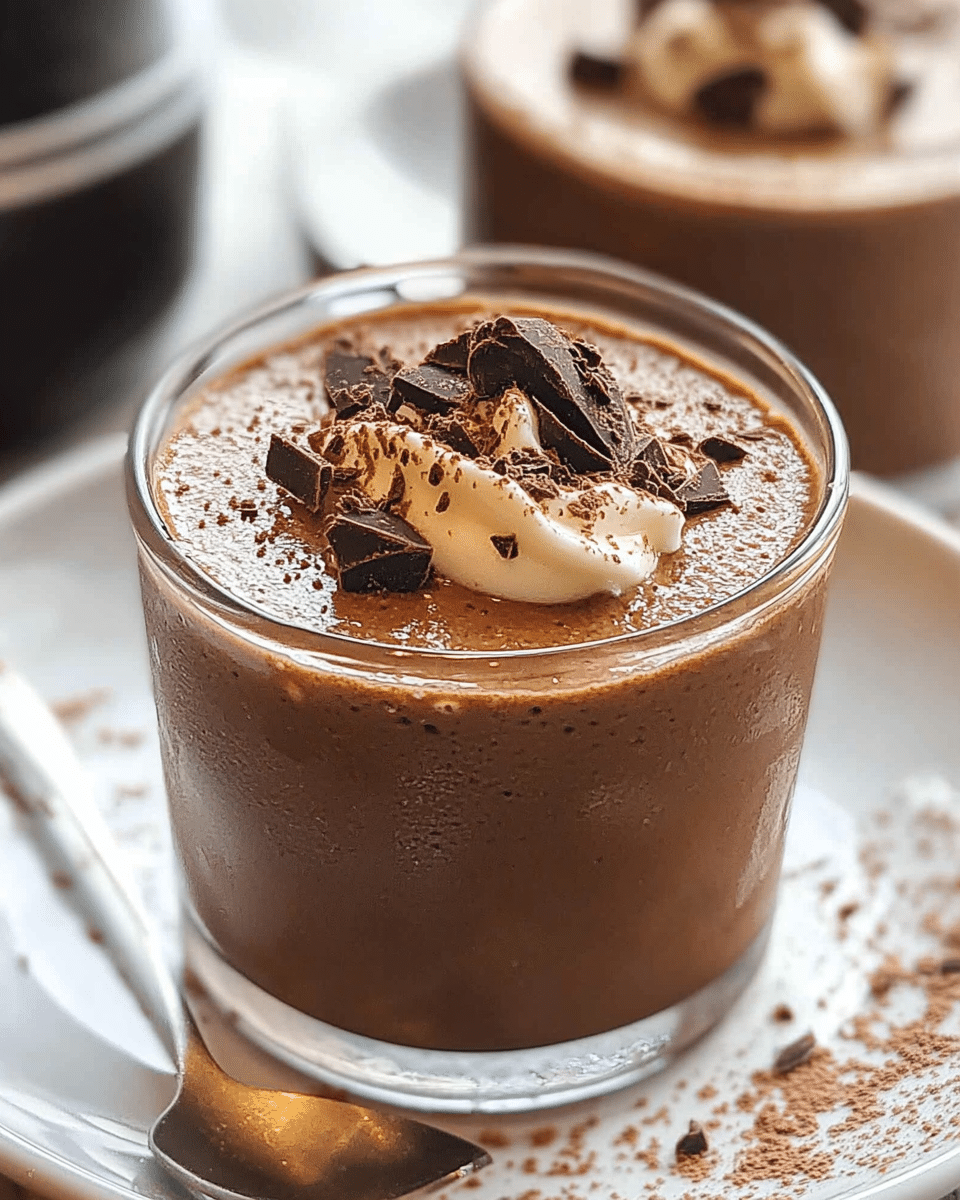
This incredibly simple, yet decadently creamy 2-ingredient mousse is the definition of effortless elegance. Ready in just minutes, this versatile dessert will become your new go-to for quick sweet treats, impressive dinner party finales, or anytime indulgences.
Why You’ll Love This Recipe
This mousse recipe will quickly become a staple in your dessert repertoire for many good reasons. First, it requires just two ingredients that you probably already have on hand. Second, it takes mere minutes to prepare with absolutely no cooking required. The versatility is another major selling point – make it chocolate, vanilla, butterscotch, or any flavor you desire. Plus, this magical mixture can serve as a standalone dessert, cake filling, fruit dip, or even a decadent frosting. The texture is perfectly light and fluffy while remaining rich and satisfying. Best of all, it can be made ahead of time and stored in the refrigerator or freezer, making it perfect for busy households or last-minute entertaining.
Ingredients
(Tip: You’ll find the full list of ingredients and measurements in the recipe card below.)
Instant pudding is the secret shortcut in this recipe. Any flavor works beautifully – classic chocolate or vanilla are always crowd-pleasers, but don’t be afraid to experiment with butterscotch, pistachio, lemon, or seasonal flavors like pumpkin spice. The pudding mix provides both structure and flavor to the mousse without requiring any cooking.
Heavy whipping cream is the magical ingredient that transforms ordinary instant pudding into something extraordinary. Its high fat content (at least 36%) allows it to whip up into a luxurious, airy texture. When combined with the pudding mix, it creates that perfect mousse consistency – light yet rich, airy yet substantial. The cream also dilutes the sometimes overly sweet pudding mix, resulting in a more balanced, sophisticated flavor.
Directions
- Using a hand mixer, prepare the instant pudding according to the package directions, but substitute heavy cream for the milk.
- Once the pudding and heavy cream are well combined, place it in the refrigerator for a few minutes, then mix it again until it becomes super thick.
- Store the mousse in a covered container in the refrigerator for up to 2 weeks. You can also freeze it! Freezing gives it a slightly different texture, making for a nice, cold treat.
- Enjoy it as a dessert, icing, pie filling, dip, or spread for fruit, cookies, or graham crackers!
Servings and Timing
This recipe yields approximately 6 servings, making it perfect for a family dessert or small gathering. Each serving contains about 210 calories. The entire preparation takes just 10 minutes: 5 minutes of active preparation time and 5 minutes of chilling time. Since there’s no cooking involved, this truly is a 10-minute dessert from start to finish.
Variations
Chocolate Hazelnut Mousse: Use chocolate pudding mix and fold in 2 tablespoons of hazelnut spread after whipping.
Layered Parfait: Alternate layers of the mousse with fresh berries, crushed cookies, or granola in clear glasses for an elegant presentation.
Coffee-Infused: Add 1 tablespoon of instant coffee to vanilla pudding for a sophisticated mocha mousse.
Citrus Burst: Use lemon or orange pudding mix and add 1 teaspoon of fresh zest for extra flavor.
Berry Swirl: Fold in 1/4 cup of berry puree after the mousse is whipped for a beautiful marbled effect.
Mint Chocolate: Add 1/4 teaspoon of mint extract to chocolate pudding mix and fold in mini chocolate chips.
Pie Filling: Pour the mousse into a graham cracker or cookie crust, chill, and serve as an easy no-bake pie.
Storage/Reheating
This mousse is perfect for make-ahead desserts as it stores beautifully. Keep it refrigerated in an airtight container for up to 2 weeks. The texture may become slightly firmer over time, but the flavor remains delicious.
For longer storage, freezing is an excellent option. The frozen mousse develops a texture similar to ice cream, creating an entirely different but equally delicious dessert. Simply transfer to a freezer-safe container and freeze for up to 3 months.
There’s no need for reheating as this is a cold dessert. If you’ve frozen the mousse and want a softer texture, simply transfer it to the refrigerator about 30 minutes before serving to slightly soften.
If using as a frosting or filling, it’s best to use it freshly made or after just a few hours of refrigeration when it’s at its optimal spreading consistency.
FAQs
Can I use low-fat or non-dairy milk instead of heavy cream?
No, heavy cream is essential for this recipe. Low-fat milk or non-dairy alternatives won’t whip up properly and won’t create the rich, stable texture that makes this mousse special.
Why did my mousse not thicken properly?
This usually happens if the heavy cream wasn’t cold enough or if you didn’t mix long enough. Make sure your cream is very cold, straight from the refrigerator, and beat until the mixture forms stiff peaks.
Can I use sugar-free pudding mix?
Absolutely! Sugar-free instant pudding works just as well and creates a lower-calorie dessert with the same great texture.
How can I make this mousse less sweet?
If you find the mousse too sweet, use a bit more heavy cream than called for. The extra cream will dilute the sweetness while maintaining the fluffy texture.
Is this recipe gluten-free?
Check your pudding mix labels carefully. Many instant puddings are gluten-free, but not all. If you need a gluten-free dessert, verify that your chosen pudding mix doesn’t contain wheat derivatives.
How do I know when the mousse is whipped enough?
The mousse is ready when it holds its shape and forms stiff peaks when you lift the beaters. If it’s still runny or soft, continue beating until it thickens.
Can I make this recipe by hand without a mixer?
While technically possible, it would require significant elbow grease. A hand or stand mixer is highly recommended to achieve the proper aeration and texture.
Can I pipe this mousse for decoration?
Yes! This mousse holds its shape beautifully when piped. Chill it thoroughly before transferring to a piping bag for best results.
How far in advance can I make this for a party?
You can safely make this mousse 2-3 days ahead of your event. Keep it refrigerated and give it a quick stir before serving if needed.
Conclusion
This two-ingredient mousse recipe proves that sometimes the simplest things truly are the most extraordinary. With just instant pudding and heavy cream, you can create a versatile dessert that rivals those requiring complicated techniques and numerous ingredients. Whether you’re serving it in elegant dessert cups, using it as a luscious cake filling, or simply enjoying it straight from the container (we won’t tell!), this mousse delivers impressive results with minimal effort. Its foolproof nature makes it perfect for novice cooks, while its versatility gives experienced bakers a quick alternative to more time-consuming desserts. Keep these two ingredients on hand, and you’ll always be just minutes away from a delightful sweet treat that’s sure to impress.
Print
The Easiest BEST Mousse Recipe You Will Ever Make (2 Ingredients!)
- Total Time: 10 minutes
- Yield: 6 servings
- Diet: Vegetarian
Description
This is the easiest and best mousse recipe you will ever make with just 2 ingredients. Ready in minutes, it’s perfect as a dessert, pie filling, icing, or dip.
Ingredients
- 1 box instant pudding (any flavor and size)
- 2–3 cups heavy whipping cream
Instructions
- Using a hand mixer, prepare the instant pudding according to the package directions, but substitute heavy cream for the milk.
- Once the pudding and heavy cream are well combined, place it in the refrigerator for a few minutes.
- Mix again until it becomes super thick.
- Store the mousse in a covered container in the refrigerator for up to 2 weeks or freeze it for a different texture.
- Enjoy it as a dessert, icing, pie filling, dip, or spread for fruit, cookies, or graham crackers!
Notes
- Freezing the mousse gives it a slightly different texture, making it a nice cold treat.
- Store in the refrigerator in a covered container for up to 2 weeks.
- Prep Time: 5 minutes
- Cook Time: 0 minutes
- Category: Dessert
- Method: No-Bake
- Cuisine: American
Nutrition
- Serving Size: 1 serving
- Calories: 210


